
Turning a Syllabus into an Online Course on Brightspace
by Stacey M. Johnson, Assistant Director for Educational Technology
If you will be teaching online, how do you plan to convert your course plan into a clean, easy-to-follow Brightspace course? The course plan or syllabus is the blueprint of your course, but now you have to construct the virtual structure according to the plans you have drawn up.
Just as in your face-to-face course, you will communicate your course design and expectations through a detailed syllabus. The syllabus explains the goals for the course, perhaps the grading scheme, major activities and assessments, and a list of readings and other materials required for the course. Syllabuses often include a list of topics or a week-by-week calendar as well as important policies and resources. The syllabus for a course becomes a roadmap of what students can expect. For more resources on constructing a great syllabus, have a look at the CFT’s guide on Syllabus Design.
With your syllabus in hand and a blank Brightspace course shell in front of you, you have a lot of options for how to translate your design to the tools and spaces on Brightspace. This post roughly breaks down the model I follow when building my own courses. My approach is:
- Start with placeholders for each Module or unit;
- set up Grades and Rubrics;
- create groups (if you need them);
- build out tools like Assignments, Quizzes, and Discussions;
- fill in the learning activities in each of the Modules, connecting everything in Content as a central location;
- double check that the syllabus matches everything in the course, then add the syllabus and a welcome message to Content;
- schedule communication to students, such as Announcements or Intelligent Agents.
(N.B. If you already have all or part of your course built out on Brightspace, this guide can still be useful for you.
If you have bits and pieces built here and there, following this plan can help you finish strong and in one fell swoop.
If you have already build all or most of your course but are worried about whether you have missed something or whether the course is consistent and easy-to-navigate, you can follow the steps in this guide as a way to proof-read and finalize your course elements in a systematic way.)
Why build out your course using this model?
This approach has several benefits:
- Consistency
By focusing on building out one tool at a time, I do a better job of ensuring that my instructions, naming conventions, dates and restrictions, and other elements are clear and consistent. Why is consistency so important?
1) Consistency makes my course look more polished and intentional which helps to convey the preparation and expertise that I have put into this learning experience. I want my students to trust that I am bringing my A-game. I suspect (and experience has taught me) that we will find an occasional typo or error, which I can live with, and I am open to making adjustments on the fly. However, the consistency is an important way I communicate my intentionality to my students.
2) Consistency helps students make sense of my course and reduces confusion. When students are spending a lot of effort trying to figure out where to go and what to click, that is time and brain power they are not spending on grappling with the content and learning activities. It’s frustrating for students to feel lost, and it can cause them to disengage from the course. For me, that is a deal-breaker in an online course. I want my design to be consistent, easy-to-follow, and simple enough that students engage fully with the course content rather than struggling through the course design
- Efficiency
When I try to build things module-by-module or week-by-week, I find I often have to take time to go back and remind myself how I did this last time. There’s a time savings to building in batches, and some relief in knowing that everything will be there when you need it. Have you ever done meal prep on a Sunday to cook once and make sure you have lunches for the whole week? This model for building courses follows that same logic, and the investment you make in batch building now will save you major headaches later.
- Getting the Big Stuff right from the start
One common question for Brightspace support is how to set up Grades in a Brightspace course and ensure accurate calculation and communication of grades. The problem is that we usually get these questions at the end of the semester when there is a huge time crunch and many grade items have already been created. I would venture that most of the Grades-related issues our instructional technologists help solve could actually be avoided altogether if the Grades area were set up in its entirety right from the start.
What are the parts of the course that absolutely need to be right? For me that is Grades and then any Tools where students will be submitting their work and getting feedback. So, I set those up first and make sure they are right before moving on.
Step-by-Step
Building a Brightspace course well upfront is an investment of time, but it will actually save you a lot of time in the end. I find a comfy spot to hunker down for a few hours, turn on something nice to listen to, and open up my laptop with my finished syllabus open on one side of my screen and my Brightspace course in another window.
In addition to walking you through the steps one by one below, I am also linking to on-demand resources from the Brightspace support page for quick reference. The linked resources all have clear instructions including screenshot images to help you make your way.
⇒Start with placeholders for each Module or unit.
My first step is to create a module in Content for each unit of my course. I organize my courses by weeks usually, so I will need to start with 14 modules, one for each week. If you use chapters, themes, or units to organize your content, that’s fine! Brightspace lets you create as many modules and sub-modules as you need. Just create one module for each unit, and name it in the clearest way possible.
I use the “Description” field at the top of each module to add information about the module topic and some guiding questions that we will answer during the unit. I also like to explicitly name relevant course goals and learning objectives that I developed during my backward design process prior to writing my syllabus. Interested in learning more about backward design as a course building process?
- CFT Guide: Understanding by Design -Bowen
- You can also sign up for the CFT’s Online Course Design Institute
⇒Set up your gradebook in Grades.
Go to Course Admin, then Grades. You will see three tabs: Enter Grades, Manage Grades, and Setup Wizard. We will be using the latter two today.
I use weighted categories to calculate grades in my courses. For example, participation equals 20% of the course grade divided up between multiple grade items like online discussions, in-class discussions, and community engagement activities. Assignments are 30%, the final exam is 10%, and the other 40% comes from a weekly reading response. Within each category I have multiple grade items, and in one category I even drop some grades. You might use a point system rather than weighted categories. All of this is possible to set up on Brightspace so that Brightspace does all the calculation and provides a private place to share feedback and grades during the term.
I start by going through the Setup Wizard to make sure I have the right settings for my particular kind of course and grading scheme.
Next, I go to the Manage Grades tab to create categories in Brightspace for each of my four grade categories from my syllabus.
My Participation category has an overall weight of 20% of the final grade, but different kinds of participation are worth different numbers of points. So, I make sure to check the setting that tells Brightspace to allocate relative weights according to how many points I assign.
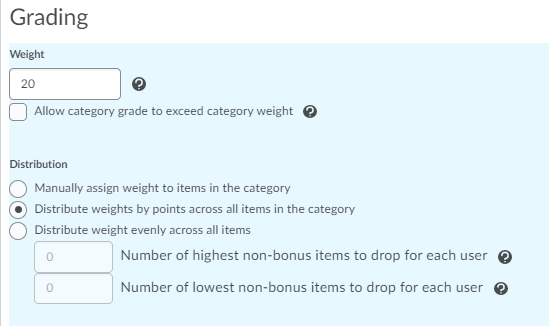
I choose the same “weights by points” setting for the categories of Assignments and Final Exam as well. However, in my Weekly Reading Response category, I need to do something different. In that category, there are 14 weeks and 14 possible reading response assignments. Students will only be graded on 12 of them. Two grade items will be dropped. Brightspace can also manage this calculation for me. I choose the setting to evenly distribute the grade item weights and then drop the two lowest as shown below.

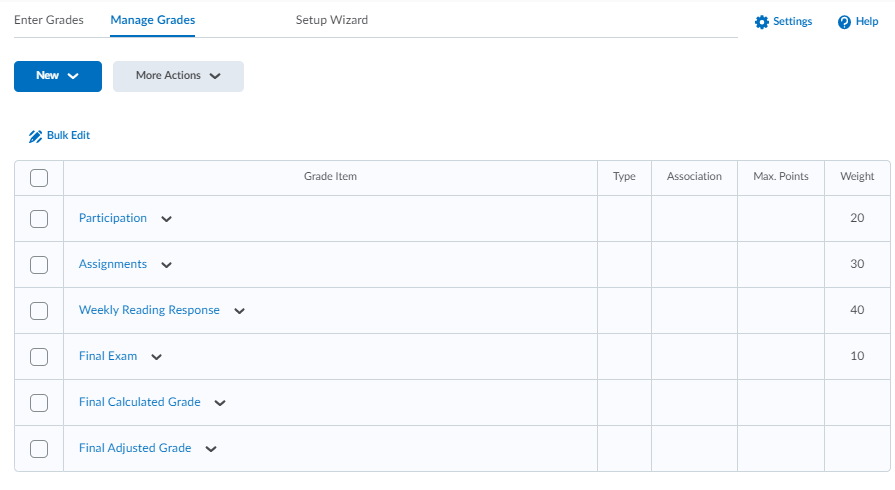
Once all four of my categories are created, my Manage Grades screen will look like this:
Now I add the individual grade items underneath each category following the steps in this guide:
When your grade items are all in, your gradebook will look something like these:
⇒Build any rubrics you plan to use to assess student work.
Rubrics can be attached to Assignments, Discussions, and used directly in Grades as well. The Rubrics tool is fairly flexible, and makes my grading much more clear and efficient. Rubrics also help communicate my expectations to students before they begin the work. I prefer to get all my rubrics set up before I build the course activities and assessments, so they are there are ready to attach to particular activities.
⇒Create groups.
Not everyone divides their students into groups in their online course, but I always include some group activities. The groups tool in Brightspace allows you to create group Assignments, members-only Discussions, and limit almost anything in the course just to certain groups of students. However, if you don’t get all those groups set up ahead of time, it will be a headache to add groups as you go. Even if you don’t yet know the membership of the groups you will form in class, you can still create the groups and tell Brightspace to randomly allocate students, or add the students manually later in the semester. However, you can’t create a group assignment or a group discussion board in Brightspace without first having set up the groups using the Groups tool.
⇒ Build out tools like Assignments, Quizzes, and Discussions.
For each tool type you are using in Brightspace, it is helpful to build them in batches. First build all the Assignments, then all the Discussions, etc. This requires you to have a clear idea of what tool you will use when.
For example, in my course, I know there will be a Discussion board associated with every single topic so students can engage in various asynchronous conversations on the course topics. So, I can go ahead and create a Discussion forum with 14 topics and make sure the instructions, start dates, and due dates are all in place. I can also connect the Discussion forum to the Grade Item and the Rubric I already created to give students feedback on their participation in the discussion. At this point, I might not have all of my discussions prompts totally figured out. That’s fine! I still can build all 14 discussion topics and get everything I *do* know into place. This is what I would call a “placeholder”. This will ensure I have the basic building blocks in place with all the settings, dates, restrictions, and instructions clearly thought out.
Brightspace support at the CFT has quite a few guides on building Discussions, which you can find here:
Maybe you know there will be an assignment due at the midterm, but you haven’t quite finished writing up the instructions or created the rubric. That is fine! You can still create the placeholder in the Assignments tool and make sure it has the right title, start and due dates, and include any information you DO have. When you do finish thinking through your assignment details, you can edit the assignment to update it. If you add a start date to an assignment, students won’t be able to view your assignment until the start date. They will be able to see the assignment is there, but they won’t be able to look at it and see the details until the start date. (Just don’t forget to go back and edit your placeholders before the start date!)
There are lots of other tools that you can use in Brightspace. Pick a few that you can get a lot of mileage out of and use those frequently. If possible, don’t use many tools. You will have better results with just a few core tools that are easy to find and students learn very well. Here are some of our guides for tools that you might find useful:
One useful step before you finish up your batch building is to take a moment to edit the NavBar for the course. Every Brightspace course comes with a default Navigation Bar or NavBar, it’s that menu of tabs that runs horizontally near the top of your course. The NavBar come out of the box with a collection of the most useful tools already linked. For example, the Activities & Assessments tab has every single tool in Brightspace listed underneath it. If you are only planning to use one or two of those tools, perhaps only Assignments and Discussions, you may consider editing your NavBar to delete the Activities & Assessments tab and add in just the two you will be using. The fewer useless links in your NavBar, the easier it will be for your students to navigate the course.
⇒ Fill in the readings, resources, and learning activities in each of the Modules, connecting everything in Content as a central location.
Now that I have all of the behind the scenes work of my course done, I turn my attention to the Content page. This is where your students will spend most of their time, where they will expect to find everything, and where I will create links to everything they will need in order to meet the learning objectives for every module.
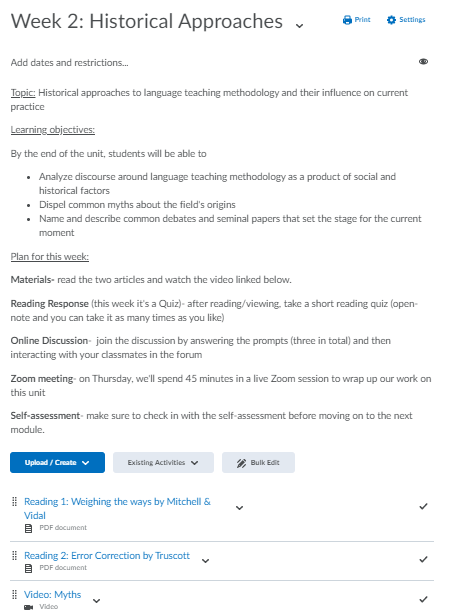
I like to include my plan for the module in an easy-to-read bulleted list in the module description, then add links to each resource underneath. In addition to uploading documents, linking to videos, or adding any other new content, I can also link to my course activities. For all the tools I previously created in batches, I now can click on the Existing Activities tab in my module (right next to the big blue Upload/Create button) to add a link to those activities in my Content module.
Here are some more guides on working with Content:
⇒ Double check that the syllabus matches everything in the course, then add the syllabus and a welcome message to Content;
This is usually an iterative process for me of going back and forth between my syllabus and my course and making changes in both places to make sure they align perfectly, and that my students will have minimal trouble navigating them both.
⇒ Schedule communication to students, such as Announcements or Intelligent Agents, and schedule any synchronous sessions.
Did you know that you can set up all of your announcements and schedule them to go out throughout the term? I love this feature. I create a quick announcement to remind students of major assignments and deadlines and preview the week ahead, and I send them out every Sunday afternoon. Only, I create ALL of them months before the course starts and schedule them to go out every Sunday at 3pm. This extra level of communication really helps students stay on track, and being able to set it all up ahead of time is a lifesaver for me.
Intelligent agents are a really cool tool that most people don’t know about. Have you ever wished you could set some sort of automatic system to send a friendly email out to any student who fails to log into your Brightspace course for a week? Just to remind them that they are missing stuff and asking them if they need any support? Intelligent Agents are how you do that.
For those of us teaching fully online this summer or in the future, having a well-built, easy-to-follow Brightspace course is going to be absolutely essential. We don’t want students so stressed out by the course design that they can’t focus on learning. And no instructor wants to end up frantically trying to build activities and assessments on the fly throughout the term. Investing some time upfront to create consistent modules, consistent learning activities, and a useful gradebook will pay dividends down the line.
If you need any help along the way, you can always reach out to the Brightspace support team for Brightspace-related questions, or to your CFT liaison for a consultation about course design and online teaching. We’re happy to help!
May 15th, 2020
This is an AMAZING post. Everyone should read this as they embark on creating their Brightspace site.