Creating Grade Items and Categories
Using Categories in your gradebook allows you to create headings that help organize your Grade Items. A category consists of one or more grade items. If you use a weighted grading system with percentages, you must use Categories to identify each weighted area. Click here to see an example of a weighted gradebook.
- Create a Grade Category – a heading system to help categorize grade items
- Create Items for your Grade Category – anything to which you will assign a grade
- Delete or Hide a Grade Item – remove an unwanted grade item or hide it from view
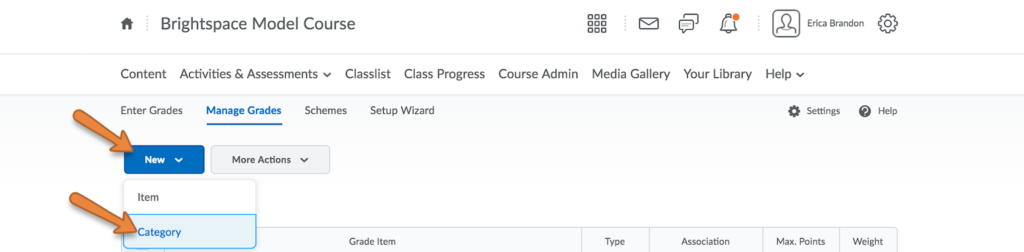
Create a Grade Category:
- Go to Course Admin -> Grades -> Manage Grades tab
- Create a Category by clicking on the New button and selecting Category.
When creating your category, be sure to include the weight (percentage of final grade) if you are using a weighted grading system.
You must determine how you would like the grade items in that category to be treated. Most often you would weigh them evenly, and possibly drop a lowest grade. You can make those selections here.
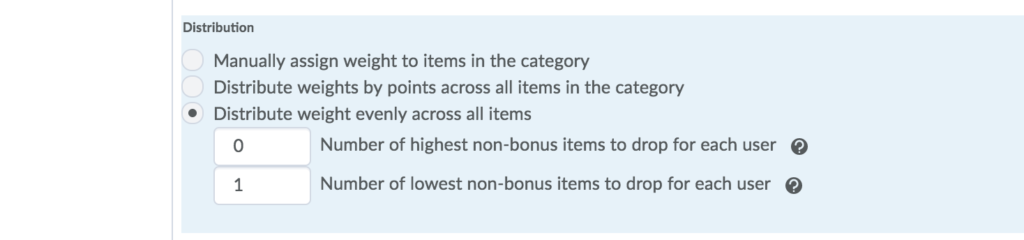
This example treats all grade items equally, and drops the lowest grade.
Be sure to click Save once you have made all the selections for your Category.
Create a Grade Item
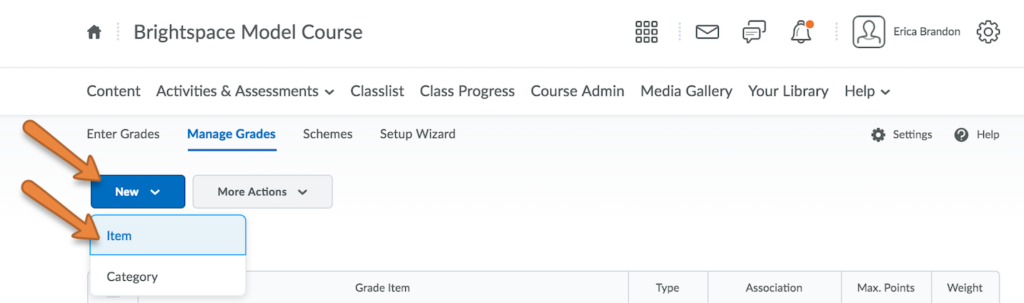
- Go to Course Admin -> Grades -> Manage Grades tab
- Create a Grade Item by clicking on the New button and selecting Grade Item.
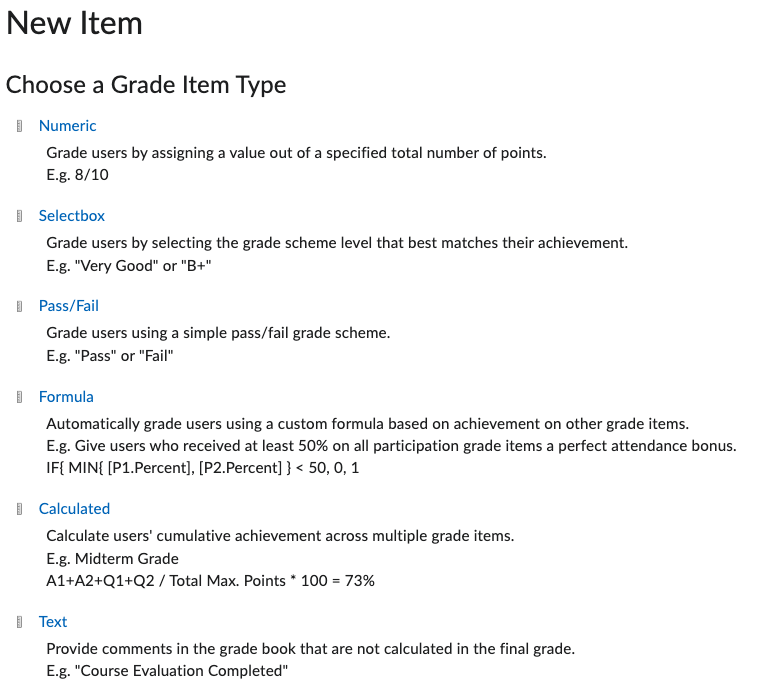
- Choose what Type of Grade Item this is. It is most common to use Numeric grades.
- Note: You must use a Numeric, Selectbox, or Pass/Fail grade type if you want the Grade Item to be used calculating the final grade.
- Note: You must use a Numeric, Selectbox, or Pass/Fail grade type if you want the Grade Item to be used calculating the final grade.
- Enter information about how your Grade Item is to be treated.
- Name – It’s best to have the name match up with the associated assignment or syllabus item to avoid confusion
- Short name – A shortened version that appears at the top of the grade column. For example: Homework 1 could be shortened to HW1
- Category – Choose which category heading this grade item will fall under in your gradebook.
- Description – This isn’t necessary unless you have multiple instructors and want to clarify what this grade item is for
- Maximum points – This is how many points the assignment is worth.
- Can Exceed – Check this if you want to allow students to exceed the maximum points, for example with extra credit questions on a quiz
- Bonus – Check this if the Grade Item is a bonus item that is not required, such as an extra credit assignment
- Exclude from final grade calculation – Check this if you don’t want the item to count toward the final grade
- Grade scheme – Typically this will be set to the default scheme “percentage” unless you have created your own grade scheme in Brightspace
- Rubric – Attach the Grade Item to a Rubric you have already created in Brightspace, or create one here
- Student View – Determine what the students will see. Typically you would check “points grade” and “grade scheme color” only
- Managing View – Determine what the instructor will see. Typically you would check “points grade” and “grade scheme color” only
Click Save and Close when you are finished
Delete or Hide a Grade Item
Before you can delete a Grade Item, it must be disassociated from any activities in Brightspace. If you need to disassociated it from an Assignment, Quiz, or Discussion – you must go into that activity and remove the Grade Item manually. Note that once a Grade Item is deleted you cannot retrieve it. If you are not sure you want to delete a Grade Item you have the alternative to hide it.
Delete a Grade Item
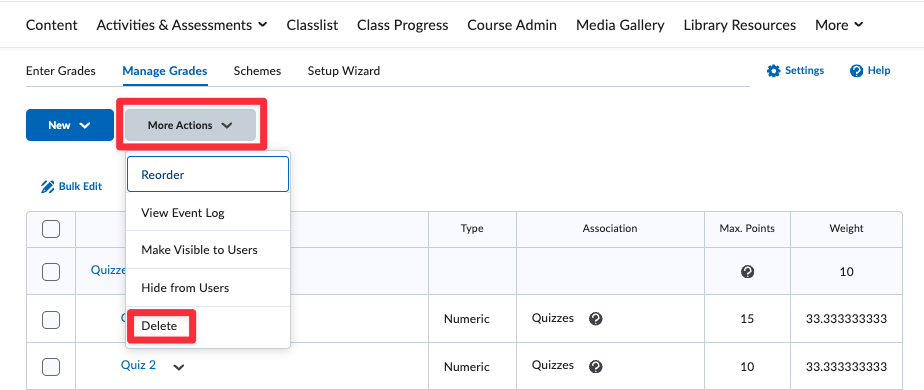
- Go to Course Admin -> Grades -> Manage Grades tab
- Click on More Actions and select Delete. Nothing will be deleted at this time, but a new window will open.
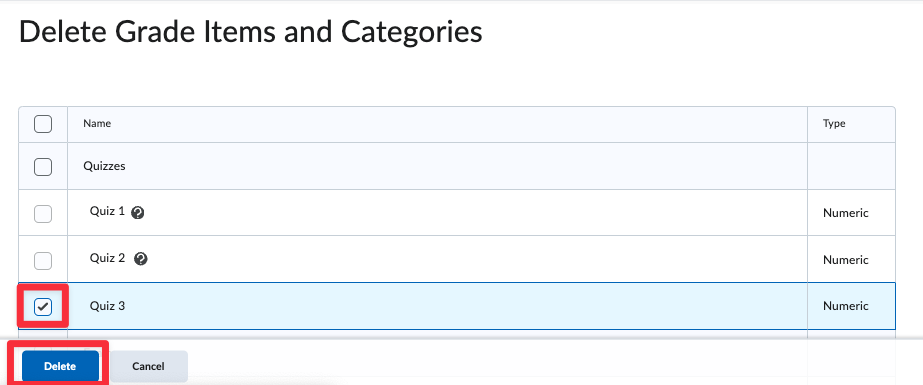
- Check the boxes of the items you want to delete
- Click the Delete button. It will ask you again if you are sure you want to delete the item.
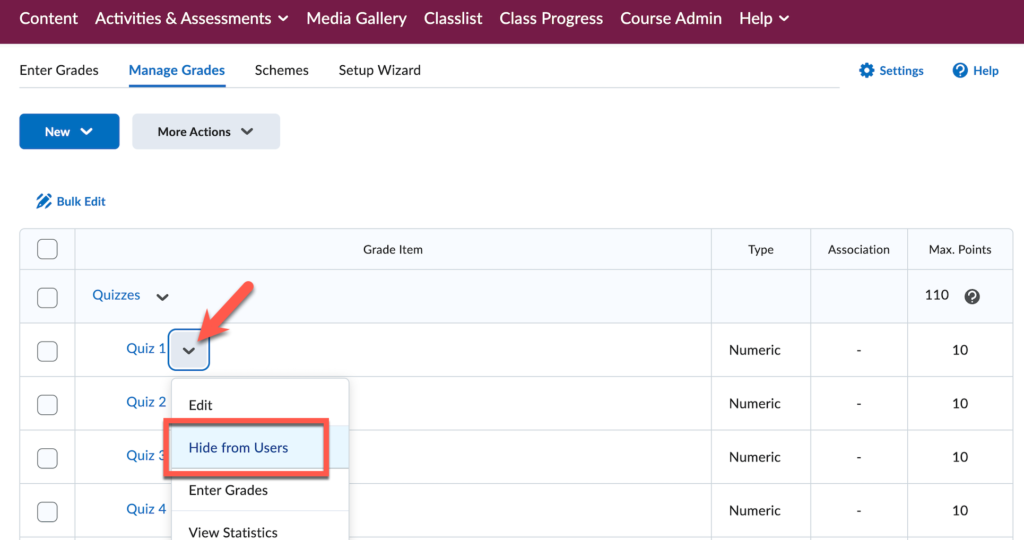
Hide a Grade Item
- Click on the drop-down box next to the Grade Item and select Hide from Users
- Now the Grade Item will have an icon displayed to indicated that it’s hidden. Note: this does not remove points or grade but only hides it from students.