Spreadsheet Accessibility
Spreadsheets in Excel are highly navigable with assistive technologies, and the following tips will help students have some context about the information inside your sheets.


Avoid using blank cells, rows, or columns for formatting
Blank cells, rows, or columns could mislead someone using a screen reader into thinking that there is nothing more in the table. You can fix this by removing unnecessary blank cells, rows, or columns.
Specify column header information in Excel tables
Having clear column headings can help provide context and assist navigation of the table’s contents.
To specify a header row in a block of cells marked as a table, do the following:
- Click anywhere in the table.
- On the Table Tools Design tab, in the Table Style Options group, select the "Header Row" check box.
- Add your header information.
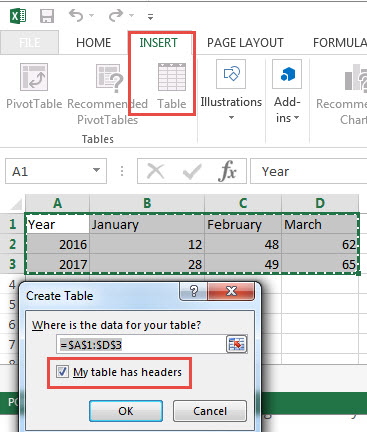
To specify a header row in a new block of cells you are marking as a table, do the following:
- Highlight the cells you want to include in the table.
- On the Insert tab, in the Tables group, click Table.
- Select the "My table has headers" check box.
- Click OK.
Screen readers recognize the Title, RowTitle, and ColumnTitle names. So as a screen reader's focus moves from cell to cell, it will first speak the relevant header, then the cell coordinates, and finally the cell contents.
Give all sheet tabs unique names
Sheet names should provide information about what is found on the worksheet, making it easier to navigate through an Excel workbook with several sheets. Any blank sheets in a workbook should be removed.
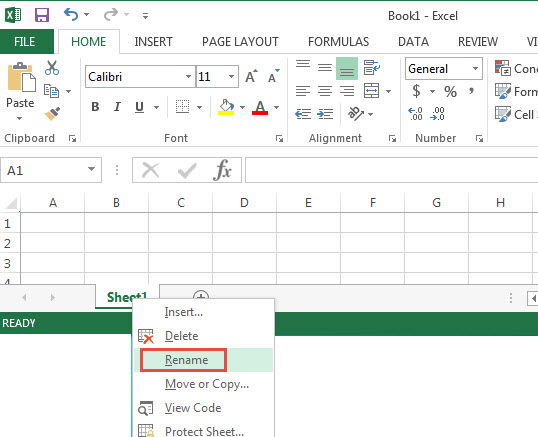
To rename a sheet, do the following:
- Right-click the sheet tab, and then click Rename.
- Type a brief, unique name that is descriptive of the sheet contents.
To delete a sheet, do the following:
- Right click the sheet tab, and then click Delete.
Add alternative text to images and objects
(WCAG 1.1.1) Back to 🔝Alternative text, also known as alt text or Alt Text, appears for a sighted person when you move your pointer over a picture or object. This alt text is read by a screen reader when it encounters and image and helps visually impaired people understand the content of images in your file. For the visually impaired, this is the only information they will have about the images and objects in your file. Alt text should be included for any of the following objects in your workbook:
- Pictures
- Clip art
- Charts
- Tables
- Shapes (that don’t contain text and are not in groups)
- SmartArt graphics
- Groups (all objects in this list, with the exception of shapes, should also have alt text when in groups)
- Embedded objects
- Ink
- Video and audio files
To add alt text to an image or object:
- Right click the image or object, and then click Format. (Note: For tables, click Table Properties.)
- Click the Size and Properties (or Layout and Properties) Icon > Alt Text.
- Type a description of the image or object into the Title and Description text boxes. Tip: Use clear, but concise descriptions. For example, “a red Ferrari” tells the reader more about the image than simply using “a car.” Include enough detail to convey the purpose of the image or object.
- Close the Formatting Pane.
More information about adding Alt Text
Use sufficient color contrast
(WCAG 1.4.1 and 1.4.3) Back to 🔝Make sure there is enough color contrast between foreground (font) color and background color.
For a stand-alone tool that can test in many applications (not just Word), try the Colour Contrast Analyzer Tool
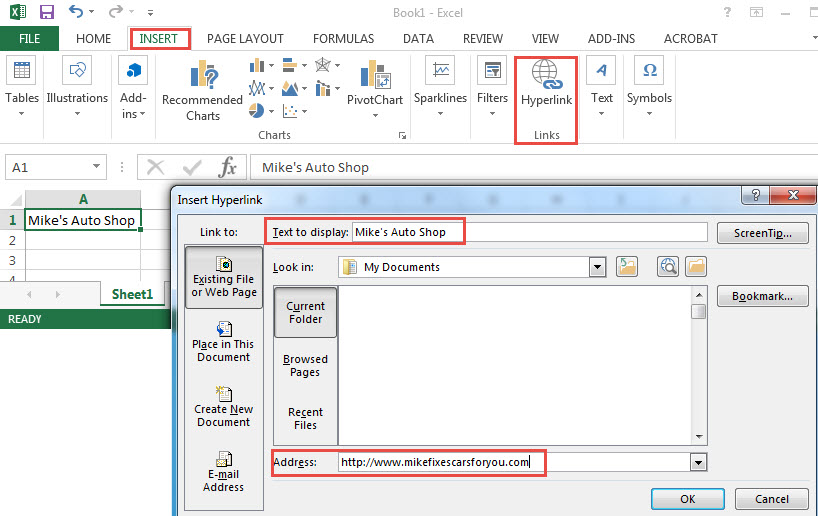
Use hyperlink text that is meaningful
(WCAG 2.4.4) Back to 🔝Hyperlink text should provide a clear description of the link destination, rather than only providing the URL. For example, Mike’s Auto Shop is more meaningful than http://www.mikefixescarsforyou.com
To add a hyperlink to your workbook, do the following:
- Place the cursor in the cell where you want to add the hyperlink.
- On the Insert tab, in the Links group, click Hyperlink to open the Insert hyperlink dialog box.
- In the Text to display box, type the name or phrase that will briefly describe the link destination.
- In the Address box, type the link URL.
- Click OK.
To change the text of a hyperlink, do the following:
- Move your cursor to the cell with the link, and then, on the Insert tab, in the Links group, click Hyperlink to open the Insert hyperlink dialog box.
- In the Text to display box, make any necessary changes to the text.
- Click OK.
Additionally, you can include ScreenTip text that appears when your cursor hovers over a hyperlink, and can be thought of in a similar way to adding an alt text for the link. To add ScreenTip text, do the following:
- Place your cursor in the hyperlink you want to add the ScreenTip text to.
- On the Insert tab, in the Links group, click Hyperlink to open the Hyperlink dialog box.
- Click ScreenTip.
- Type in your text in the ScreenTip text box.
- Click OK.
Include closed captions for any audio or video
( WCAG 1.2.2 ) Back to 🔝
If you use audio or video components in a workbook, ensure that the content is available in alternative formats for users with disabilities, such as closed captions, transcripts or alt text. Review this video captioning resource .