Document Accessibility
Document accessibility is the cornerstone of classroom access. Word docs and PDFs are the vector of so many expectations, instructions, and assignments. Here are a few practical tips that will help students using assistive technologies access the information that you want to share.


Word's Built-in Accessibility Checker
For Word docs, you can run the built-in accessibility checker for help in finding accessibility issues. Please Note: The accessibility checker only checks .docx files
Office for Windows
- Go to the File tab.
- Select Info from the sidebar menu.
- Click on the Check for Issues button.
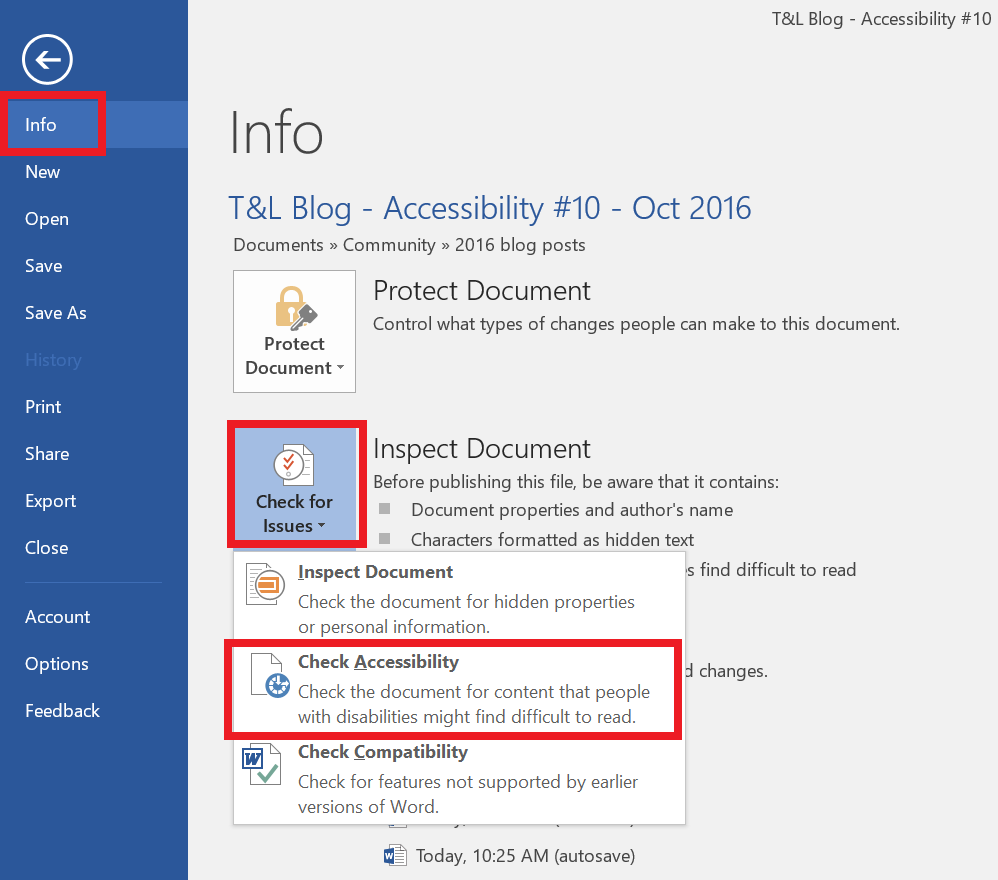
- Select Check Accessibility from the drop-down list.
The Accessibility Checker panel will open to the right of the document. The accessibility checker provides you with a list of errors, warnings and tips.
Office for Mac
- Go to the Tools menu
- Choose Check Accessibility
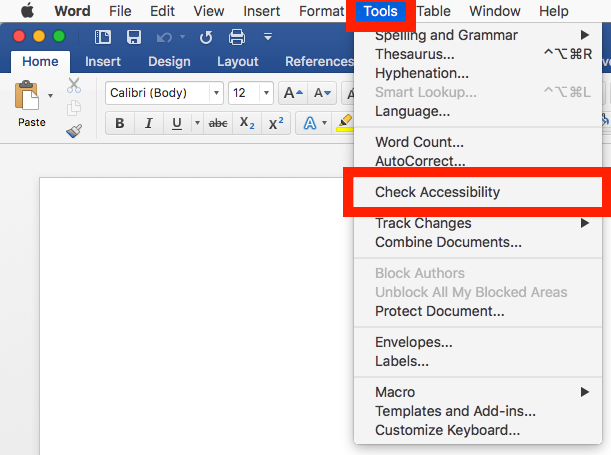
The Accessibility Checker panel will open to the right of the document. The accessibility checker provides you with a list of errors, warnings and tips.
Keep information perceivable
Alternative Text Tags
Descriptions of images (alt text) allow screen reader users to benefit from the information being conveyed by an image.
What information should you include or exclude from alternative text descriptions? See the DIAGRAM Center's alt text resource .
In Microsoft Word:
- Right click on the image and choose Edit Alt Text.
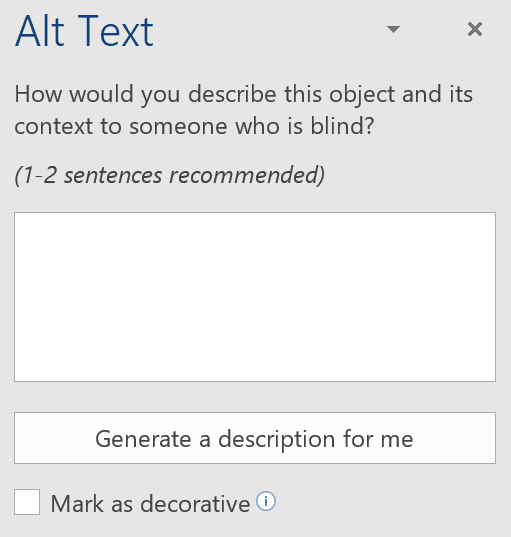
- Type your alt text into the edit field.
- There is no Save button. You can either close the side bar or click on a different picture.
See Complex Image Accessibility for images that cannot be adequately described in alternative text (which should be limited to one or two brief sentences).
Lists
If order is important in your list, make it a numbered list. If order is not important, a bulleted list is a better choice.
In Microsoft Word:
- Select the text that you want to make into a list.
- On the Home tab, in the Paragraph group, select the Number (ordered list) or Bullets (unordered list) icon.
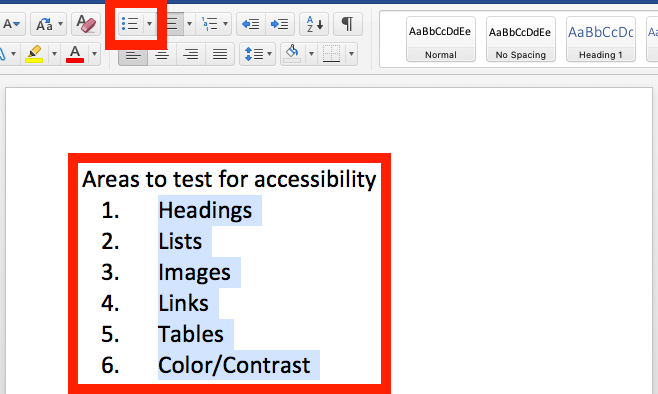
The numbered (ordered) list in the picture above is highlighted to show that it would be better as a bulleted (unordered) list because the order of the items is unimportant.
Forms
In order for someone using assistive technology to be able to fill out a form, the form needs to be electronic, and the fields need to be associated with their corresponding labels.
- Forms that are created in Word often use underscores (________) to create a space where people are meant to add text. This is an awkward way to fill out a form for everyone, but especially so with a screen reader. The software reads "underline, underline, underline, underline" for each underscore you used.
- If you don't know how to test with a screen reader, please email satech@vanderbilt.edu for advice.
Check the reading order of forms
Tab order and proper labeling of form fields and buttons is important to people who are blind or physically disabled.
- To check the reading order of a form, try pressing the Tab key to navigate through the form choices. Does it proceed in the order someone would want to fill it out? If it doesn't you will need to edit the order of the form fields.
- Can you submit the form without using the mouse? (The keyboard command to activate a button or link is the Enter key.)
Tables
Designating column and row headers in a table is essential. You can also add alternative text descriptions to tables to give an overview of the information in the table.
In Microsoft Word:
-
Put your cursor in the first cell of your data table.
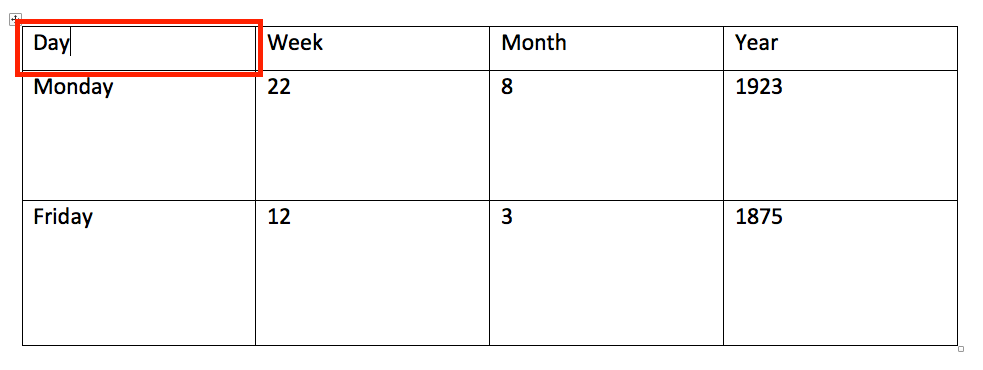
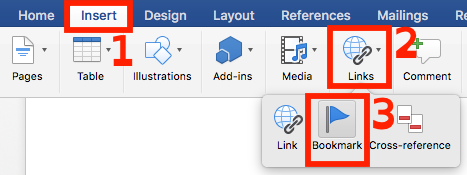
- Go to the Insert tab and choose the Link dropdown. Choose Bookmark.
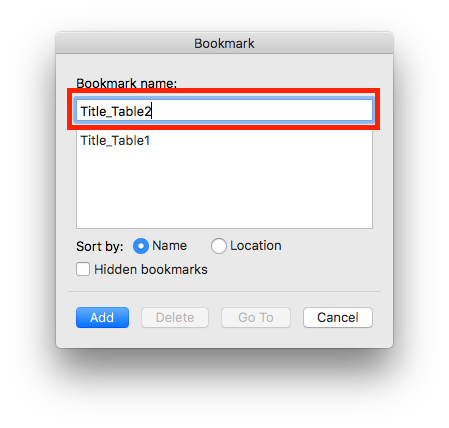
-
Type in a unique name for each table bookmark. For the two tables in my example, I have used Title_Table1 and Title_Table2.
- Choose the Table Design tab and make sure the Header Row check box is checked.

- Next, click on the Table Layout tab.
- Click on Repeat Header Row button (I know this isn't intuitive, but it's very important to designate the top row as table headers.)

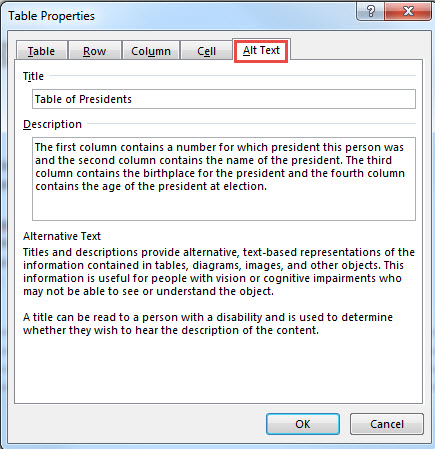
-
Right click on the table and select Table Properties.
Describe the contents of the table by selecting the Alt Text tab.
In the table properties window, give the table a title and provide a summary of the table's contents.
Please note:
- Bookmarks in the first cell of tables, as shown in this YouTube Table Bookmarking video, will help screen reading software repeat the header row values for each cell below it (super useful in not getting lost in table data!). The video also mentions some things you should not do when creating a table in a Word document.
- Microsoft Word now allows the top row and first columns to be marked as table headers! Unfortunately, the first column headers do not export to PDF. However, if you save the Word doc as HTML, the top row and first column headers DO export correctly!
Heading Structure
(WCAG 1.3.1 and 1.3.2 ) Back to 🔝
It isn't enough to make text big and bold to look like headings. Section titles need to be formatted as headings.
In Microsoft Word:
- Place your cursor on the line that you want to become a heading.
- Go to the Home tab.
- In the Styles group, choose the appropriate heading level (see the next section on how to use headings in the proper order).
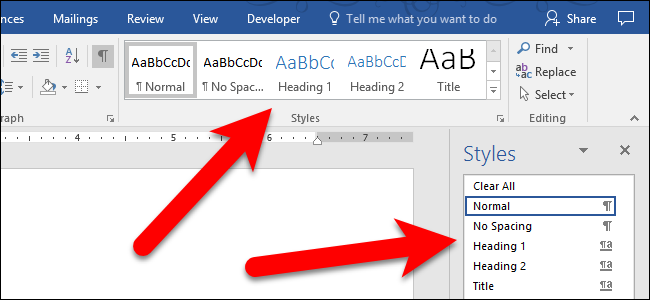
Picture from How To Geek
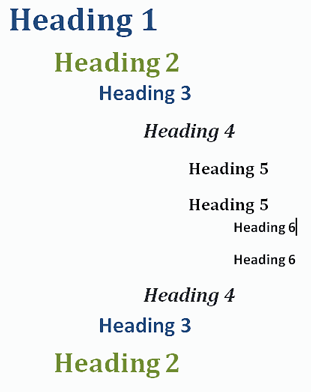
Heading Order
In addition to formatting headings as headings, the headings need to be used in the correct order. Headings chunk your content, making it easier for everyone to read. Headings are also a major way of navigating with a screen reader.
Headings must be used in the correct order for them to be useful.
- Heading 1 is like the title of a book and there is just one Heading 1 per page. Heading 2s are like chapter titles. Heading 3s are sub-sections of those chapters, and so on.
- Heading order is similar to the order of an outline.
- DO NOT skip heading levels. Eg. Heading 1 straight to Heading 4 could confuse screen reader users. Instead, only step down one level at a time.
- See below for a visual display of correct heading structure.
Color and Contrast
(WCAG 1.4.1 and 1.4.3) Back to 🔝
Using color or text cues alone to make a distinction, a comparison or to set something apart from the rest of the web page can exclude students that aren't able to perceive those text changes. If you categorize something by color or size alone, those who are color blind or blind will not benefit from the distinction.
Instead, add some text that makes the element stand out to people with a vision impairment. I.e. "DON'T MISS THE DEADLINE!" is better written as "Important note: Don't miss the deadline!" because it announces "Important note" aloud to text-to-speech users, instead of using visual text cues.
Use sufficient color contrast
Make sure there is enough color contrast between foreground (font) color and background color.
For a stand-alone tool that can test in many applications (not just Word), try the Colour Contrast Analyzer Tool
Machine-readable Text
Scanned pages are often put into PDF format. If these pages do not have text recognition performed on them, they will simply be images of scanned content. Assistive software is not able to access the text if it has not been recognized with optical character recognition (OCR).
Text inside JPEGs, PNGs, etc. is also not readable by assistive technology. See Alternative Text Tags
- If you insert an image with text in it, make sure to type the text in the alternative text or in the body of the document.
- Refrain from using floating text boxes or floating images, which are not readable by assistive technology.
Math Content
Mathematical equations and scientific notations must be written with MathType or Microsoft Word's Equation Editor.
Another option is the Brightspace equation editor.
Make interfaces operable
Descriptive Links
Links are important to everyone. If the links are embedded into meaningful text, they are much more useful.
In Microsoft Word:
- Type out text that describes the destination of the link.
- Select the text, right click and choose Hyperlink... from the menu.
- The Insert Hyperlink window will open.
- Type or paste the URL of the webpage in the Address field.
- Then click the OK button to save the link.
Create understandable pages
Document Language
Documents are read aloud by assistive software in whatever language the author marks. This means that language synthesizers can switch languages while reading, but only if the document author marks languages appropriately.
In Microsoft Word:
- Highlight a part of the document that is a language other than English
- Go to the Review tab of the ribbon
- Choose the Languages dropdown
- Choose "Set Proofing Language" if you're using Word in Windows
- Uncheck "Detect Language Automatically" checkbox
- Choose the correct language for that section of the document
- Repeat for any other sections of the document that are in a language other than English
![]()
Information for this page was adapted from PCC's website and is based on the Creative Commons license.