
Enabling live transcription in Zoom

Live Transcription provides robot transcription services, which enables speech to text transcription in Zoom Meetings and Zoom Webinars. This feature is enabled by the host of the meeting or webinar once it begins. Participants will not see the Live Transcript option unless the host enables it.
This is a two-step process which begins with enabling this function in your Zoom account prior to the meeting. Once you’ve done so, you can turn on live transcription in your meetings at any time.
- Step One: Enable Live Transcription for all meetings
- Step Two: Turn Live Transcription on during a meeting
Created February 2021
Enabling Live Transcription in Zoom
Step One: Enable Live Transcription in your Zoom account
The Live Transcription function only needs to be enabled in your Zoom account once. After you’ve done so, this option will be available during your meetings permanently.
- Navigate to vanderbilt.zoom.us and select Sign in
- Sign in with your VUNet ID and password
- On the left sidebar, choose Settings, then click In Meeting (Advanced)

- Locate the Closed Captioning heading
- Turn on the blue toggle switch to the right (shown below)
- Check the box for Enable live transcription service to show transcript on the side panel in-meeting

Step Two: Turn on Live Transcription during your meeting
Note: Live Transcription must be enabled during each meeting in which you intend to use it.
- Begin your meeting
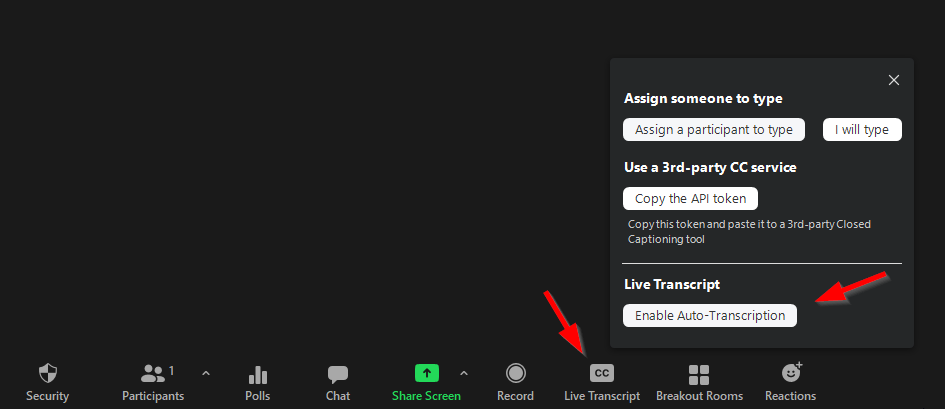
- At the bottom of the screen, select Live Transcript. If you don’t see it, you might need to resize your window to be wider.
- Click Enable Auto-Transcription. This button will turn blue, indicating that live transcription has begun
- You will now see live transcription appear along the bottom of the screen. An example of what this looks like is below
