Wond’ry Innovation Portal Guide – Mentor Version
This Guide is intended for Wond’ry Mentors.
For Vanderbilt Students, Staff, and non-Mentor Faculty, please see the General User Guide.
Hello Mentors!
The Wond’ry Innovation Portal is a mentor connection platform that allows students to connect with you, schedule meetings (referred to as “Sessions” in the Portal) with you, and track progress on their projects with you. You can set up your profile to display any biographical information you like. You can also browse a list of Wond’ry students’ projects and get in contact with groups who catch your interests.
Contents
How to Sign Up
While it is possible to create an account yourself on the Innovation Portal, this will not give you the appropriate Mentor access. Any accounts created this way will only have student-level access.
Instead, you will receive your Innovation Portal account information by email.
For issues with account access, send an email to thewondry@vanderbilt.edu to request assistance.
Quick Start
The first time you sign in to the Innovation Portal, just a few tasks will get you set up to begin Mentoring.
- Check your Profile. A simple Profile will already be created for you, but you can customize it to your liking.
- Set your Availability to set times you want to meet with students. You can skip this step if you prefer to personally arrange times with students for each meeting request.
- Change your Contact Info if you would like to receive text notifications or automate Zoom meeting creation.
Help Menus
Detailed help menus are available inside the Innovation Portal. Just look for the ![]() Online Help button or the
Online Help button or the ![]() blue Question Mark (?) button.
blue Question Mark (?) button.
Home Dashboard
Upon signing in, Innovation Portal Home Dashboard will look like this:
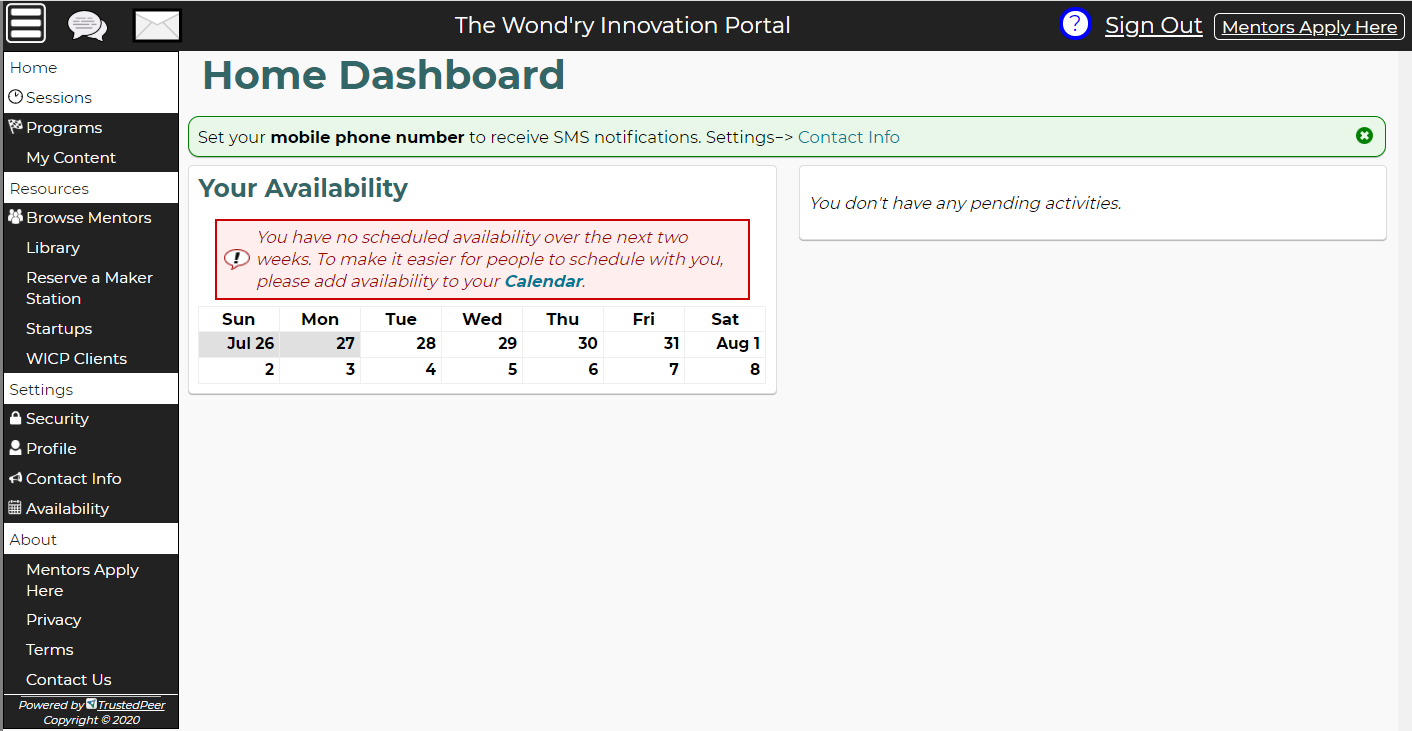
The Home Dashboard will list any announcements or notifications at the top, as well as any pending meetings or sessions. You may click the X button beside an announcement or notification to dismiss it.
Depending on settings you choose which are described in the Contact Info section, you can receive Dashboard notifications about pending meetings and messages to your personal email or SMS text.
Main Menu
This is the Main Menu. It allows navigation around the Innovation Portal.
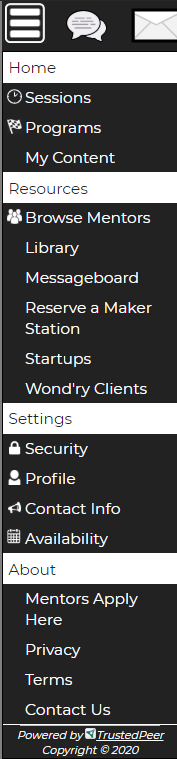
- The
 Menu button hides and reveals the Main Menu (pictured here), allowing you more screen space if desired.
 - The
 Chat button opens the chat frame, which you allows to chat with Teams you are a part of. Teams are usually composed of students working together on a project, so most Mentors will likely not need to use this feature. If you are not a member of any Team, this icon will not appear.
 - The
 Inbox button shows messages received from other users as well as system messages.
 - Home returns you to the Home Dashboard.
- Sessions lists meetings you have had or have currently scheduled with students. For sessions which have already occurred, you may review notes from the meetings. For sessions which are scheduled in the future, you may reschedule or change details of them from this screen.
- Programs lists Wond’ry courses you are involved with that are implemented through the Innovation Portal system. Most Mentors will not use this feature, unless they are more directly involved in some aspect of teaching those programs.
- My Content lists teams and projects with which you are involved. If you are listed as Team member on a students Startup, or if you make posts on the Messageboard, those items will be listed in My Content. You can click links to those posts and edit them from this page. Please note that details you add in this section are NOT private and will be listed in the various Resources sections, which can be viewed by anyone with Innovation Portal access.
- Resources shows the landing page for the Resources section, which is similar to what is already available in the menu, such as Browse Mentors, Library, Startups, etc. However, the landing page will also shows a section called “Resources you created” which shows which Content areas you have posts in.
- Browse Mentors shows a searchable list of available Mentors (including you!), along with biographical information about each Mentor. Search by name, by the mentor’s area of expertise, or by other criteria. Students can schedule meetings with a mentor via the profile pages in this section. You will be already listed here with some basic profile info when you receive your Innovation Portal account, and your profile can be further customized in the Profile section.
- Library contains a variety of innovation-related content for convenience. If you have a particular document, file, or website link which helps with your Mentoring, email thewondry@vanderbilt.edu and we can add it here for students to access!
- Messageboard is a space to make public posts for everyone to see. You can also leave comments on posts. Use this to announce news or post project details. Students will also use this section, so it’s a great place to interact.
- Reserve a Maker Station is the Wond’ry’s makerspace reservation system. During the COVID-19 pandemic and while physical distancing and enhanced sanitation protocols are in place, anyone wishing to access the Wond’ry’s making and prototyping resources MUST reserve a time-slot in order to use ANY of the Wond’ry’s makerspaces. Walk-in visitors to makerspaces are not permitted at this time.
- Startups is the master list of projects created or worked on by students with which the Wond’ry has assisted or been involved with. Check out how your mentees’ project looks to other people in this section, or check out all the cool innovation projects the Wond’ry has helped with!
- Wond’ry Clients lists organizations and businesses with whom the Wond’ry has partnered on various projects, as well as details about those projects.
- Settings shows the landing page for the Settings section, providing a short description of each section. These sections (Security, Profile, Contact Info, Availability) can be selected individually from the menu.
- Security allows you to change your email and password settings.
- Profile allows you to enter biographical and contact information on yourself for others to see. This is where you will input the information that students see when looking for a Mentor, so make sure it is descriptive of the kind of mentorship you want to provide! Besides appearing in the Mentors section, people can visit your profile by clicking on your name in your projects and posts on the Innovation Portal.
- Contact Info allows you to connect the Innovation Portal to other platforms like Zoom or Skype, as well as allow you to set up text message notifications for Innovation Portal functions, such as reminders for when you have a Session with a student.
- Availability allows you to connect the Innovation Portal to an external calendar, like Google Calendar or Outlook, or Apple Calendar. The calendar will then be imported into the Innovation Portal to show the times you are available for mentoring. Only time blocks from your calendar will be displayed to other uses, not the private details of your schedule (they will appear labeled as “Busy” only). You can also set specific “office hour” times that you are available for mentorship meetings with students, which can then be seen by students in the Innovation Portal. This can help automate scheduling and tracking your session appointments with students.
- During the COVID-19 pandemic and while physical distancing and enhanced sanitation protocols are in place, all Mentor meetings should be conducted virtually. As such, the Availability tool can be a key component in helping students set up meetings with you easily.
- About links to the About landing page, providing links to the Privacy Policy, Terms and Conditions, and the Online Help section.
- Mentors Apply Here links to the Wond’ry’s email address. As you are already a Mentor by now, you will not need to use this link. However, please feel free to encourage other talented individuals you know to apply!
- Privacy links to the TrustedPeer Privacy Policy. The Innovation Portal is powered by the TrustedPeer company.
- Terms links to the TrustedPeer Terms and Conditions of Use. The Innovation Portal is powered by the TrustedPeer company.
- Contact Us allows you to contact Innovation Portal technical support. This will contact TrustedPeer rather than the Wond’ry. If you need to contact the Wond’ry, please email thewondry@vanderbilt.edu with any questions or concerns.
Profile
Choose Profile in the menu to edit and preview your profile. The Edit Profile page looks like this:
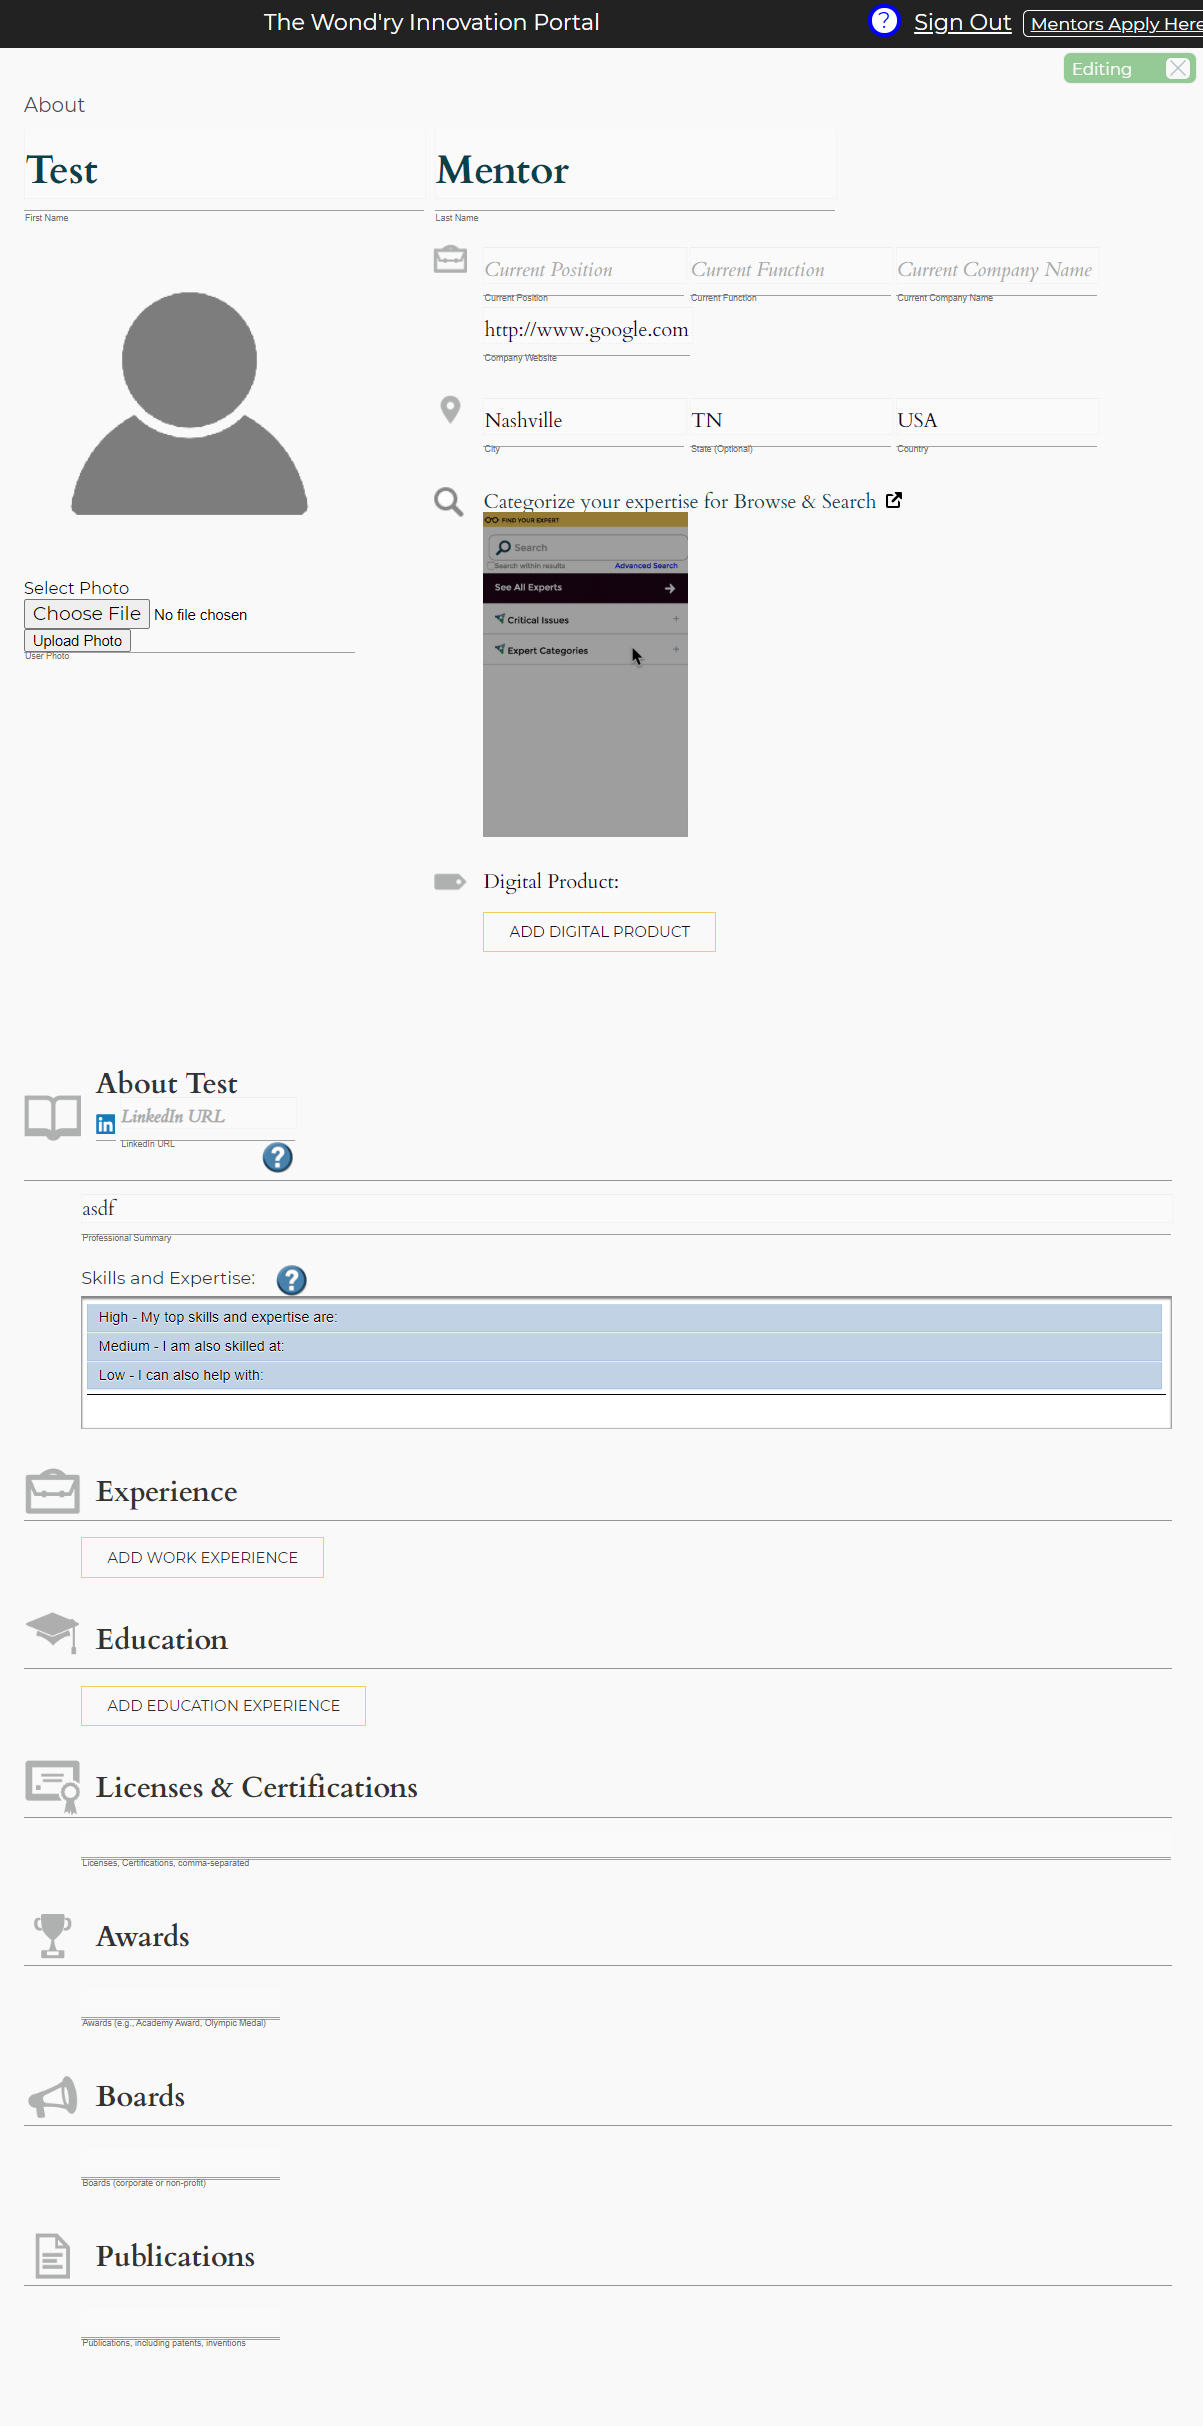
The green “Editing” notification in the upper right indicates you are in Edit mode. To preview how your profile looks to others, click the the green Editing box. When viewing the profile, the green Editing box will change to white and say “Edit Page”; click the box again to return to Edit mode.
All fields auto-save after editing, so there is no need to manually click a Save button.
Most fields in the Profile are self explanatory and can be filled out to your preference. Certain fields, such as the “About” field, allow for rich text editing, including the ability to add hyperlinks. Fields which are left blank will not appear when others view your Profile.
One field to note is the LinkedIn URL field. When filling out this field, do not include http://linkedin.com/ as part of the URL. So for example, if your full LinkedIn URL is http://linkedin.com/in/myname/ , in this field in your Profile, simply enter the in/myname/ part.
The Digital Product field is a special field allowing you to upload documents to your profile for download. Please note that while the file upload box asks for “Price,” all uploads should be set to $0.00, as the Wond’ry Innovation Portal does not make use of the platform’s merchant features. Examples of Digital Products you might want to upload include your personal CV, resume, publications, news articles, or images. Large files, such as video or sound, should not be uploaded as a Digital Product.
An important field for consideration is the “Categorize your expertise for Browse & Search” field. The Categorize field will let you choose what industry or specialization you appear under when a student is searching for a mentor. Clicking the Categorize link will open a new tab in your web browser showing the page below:
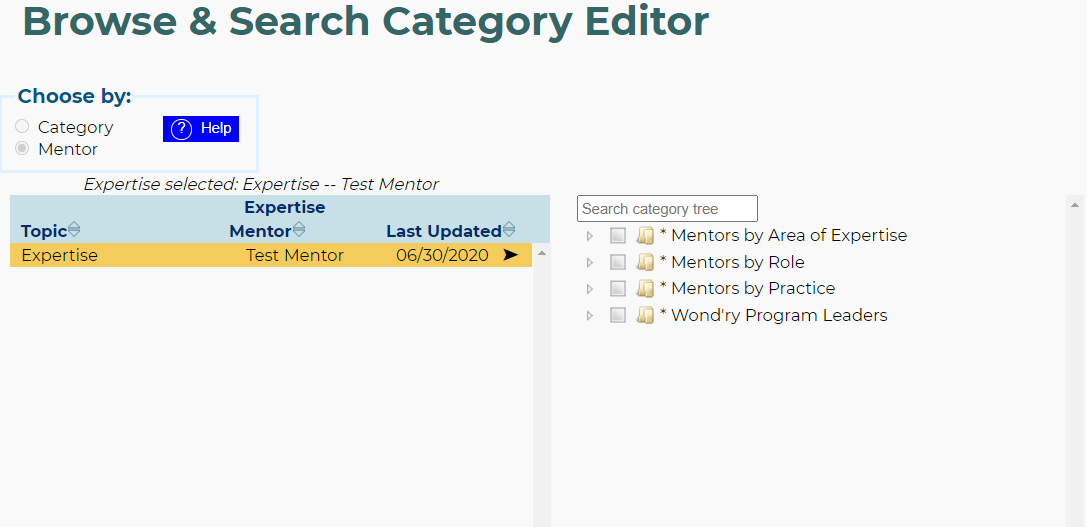
The category list on the right provides options you can pick. The options “Mentors by Role”, “Mentors by Practice”, and “Wond’ry Program Leaders” are for Wond’ry staff usage only, but please feel free to select as many options in the “Mentors by Area of Expertise” categories as you like. Simply open the drop down menus and click the box beside each desired category. You may choose the category header or a more detailed subcategory, like so:
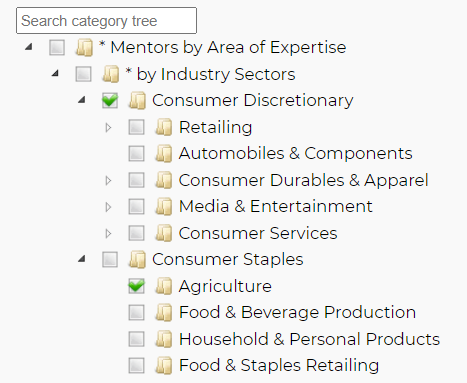
In this example, this mentor would show up in search results for Consumer Discretionary, Consumer Staples, and Agriculture. Note that choosing a category header–such as Consumer Discretionary in the example here–will not cause you to appear in search results for the subcategories. So, for example, the mentor to the left would not show up when a student searches for Retailing, even though Consumer Discretionary is above Retailing.
Changes are auto-saved as soon as you choose a category. Once you are done choosing Categories, you may close the tab to return to your profile.
If you do not see a Category and believe it should be added, please email thewondry@vanderbilt.edu
Another field to note is the “Skills and Expertise” field, which looks like this:

This field uses functions not enabled on the Wond’ry Innovation Portal, so please leave it blank.
Contact Info
Choose Contact Info from the menu to change settings regarding how you receive communications. The Contact Info page looks like this:
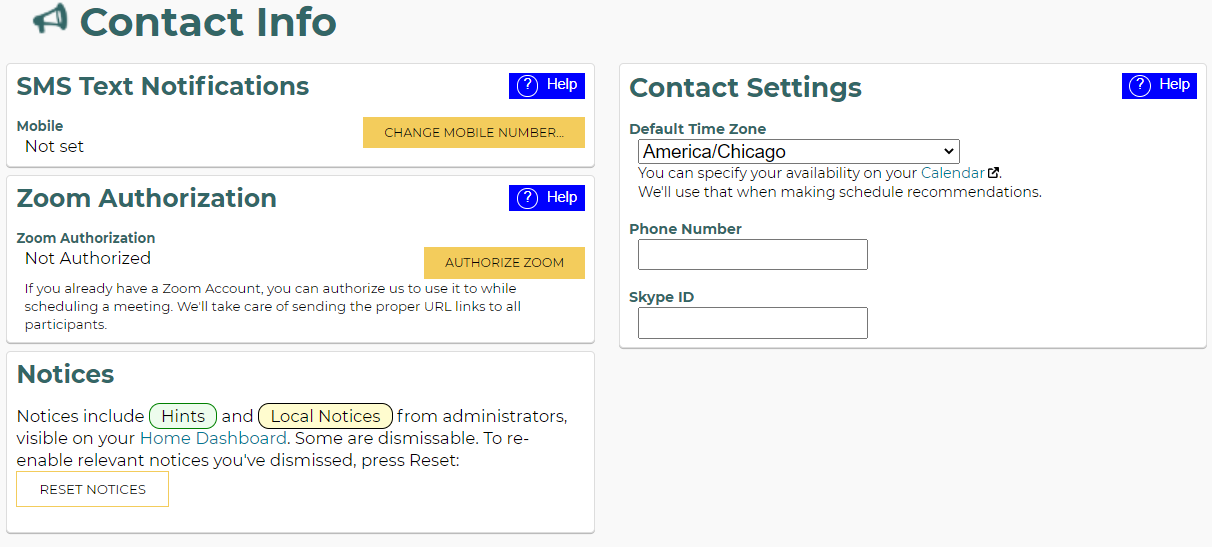
SMS Text Notifications
You can set a mobile number for SMS Text Notifications in order to receive notices about scheduled mentorship sessions and Innovation Portal messages. Text notifications include:
- When you are sent a private message in the Innovation Portal from another user (student or Mentor)
- When a student schedules a Session with you
- When there is a change in a scheduled Session
- When a student submits a Session Worksheet to you
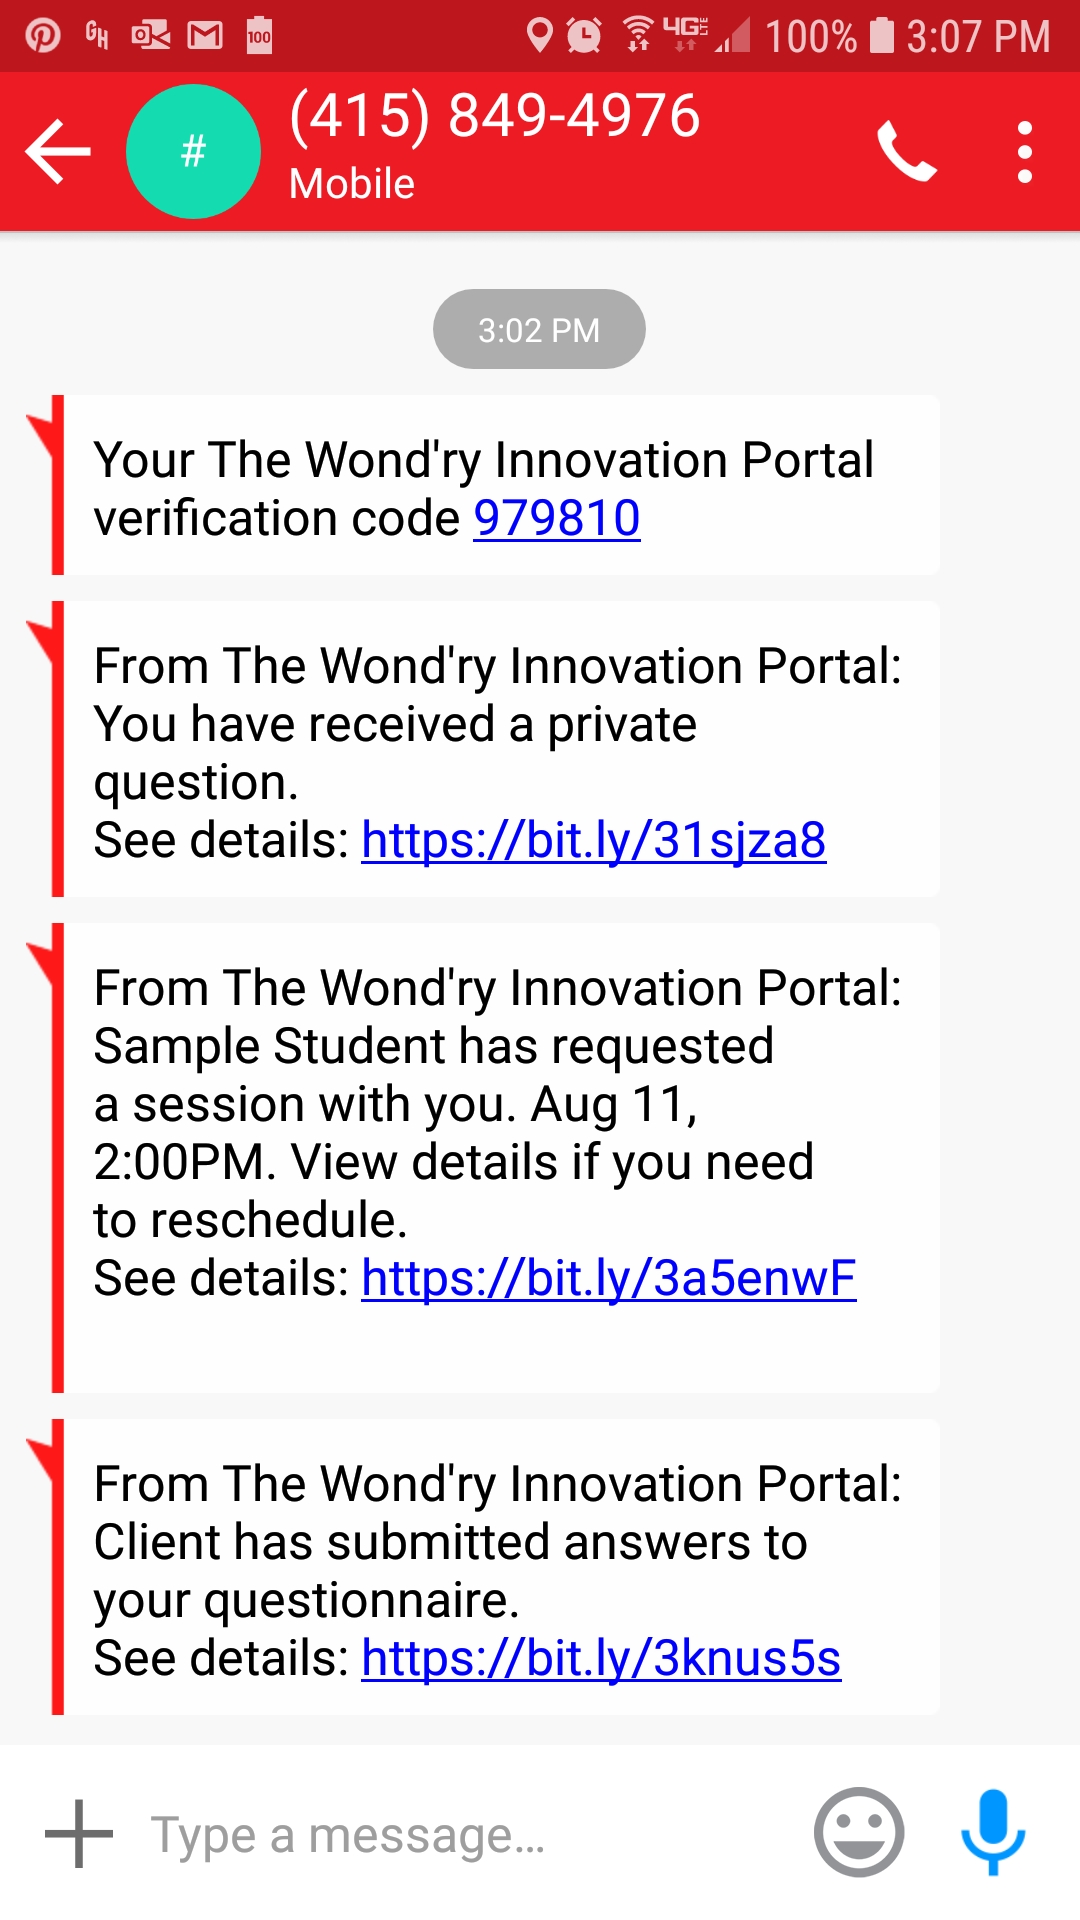
Example SMS messages:
Zoom Authorization
By setting up Zoom Authorization, the Innovation Portal and Zoom will automatically set up a Zoom call for your scheduled mentorship sessions. Vanderbilt University provides all students with a Zoom Premium account, so this is a convenient way to meet virtually with students. Mentors must create and manage their own Zoom accounts. Both free and premium Zoom accounts work with the Wond’ry Innovation Portal.
Click here to be taken to the Zoom website.
Other Contact Info
Contact Settings allow you to set your Time Zone (Vanderbilt University is in the America/Chicago time zone). You can also set a Phone Number and Skype ID, although these are usually used in the creation of a Session. As a Mentor, you will usually not be the person creating a Session, so it is okay to leave this blank.
Notices allows you to reset the system notices on the Home Dashboard page, in case you dismissed one prematurely.
Availability
The Availability screen allows you to set up your calendar so that set specific times for students to request Session meetings with you. This helps automate the process of scheduling.
If you do not set your Availability, a student requesting a Session with you will enter a requested date and time. You can respond to the request and change the time if desired.
The Availability screen will look like this:
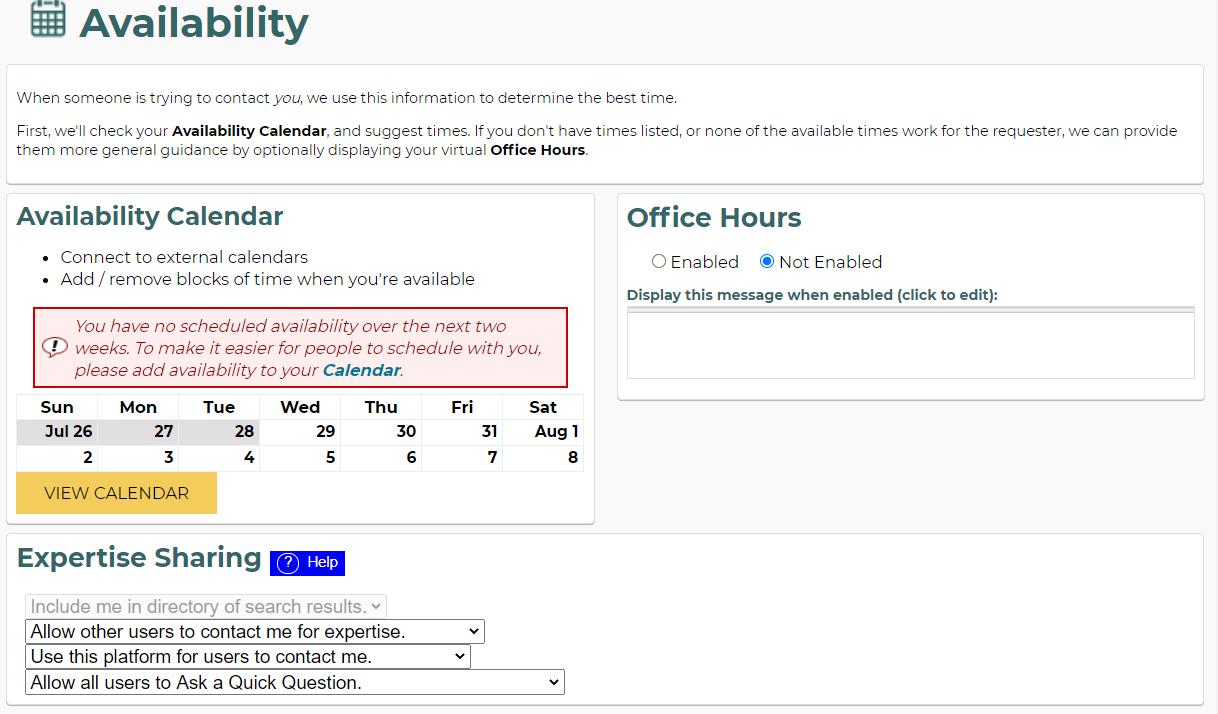
There are two primary Availability options:
- Use the Availability Calendar to completely automate scheduling of Sessions with students. Students will be able to choose time slots on your calendar directly, and your calendar will be marked with an appointment notification and reminder.
- Use Office Hours to set a message that will be displayed when a student is requesting their own time. This method will NOT automate scheduling and will require you to coordinate more directly with students (via phone, email, etc.) to confirm the Session time.
The Expertise Sharing section allows you to customize how you wish to be contacted. All Mentors are automatically included in the directory, so that option is greyed out. However, you may change the “Allow other users to contact me” option if you wish to take a break from Mentorship (but if so, please contact thewondry@vanderbilt.edu to let us know). The “Use this platform” option allows you to set whether or not you want students to use the Innovation Platform interface to schedule sessions with you. This is recommended for all Mentors, but if you chose to change it, a box will appear requiring you to state how you would like to be contacted. Finally, the “Quick Question” option allows you to select whether you want to receive messages in general (other than Session notifications) from Innovation Platform users.
Availability Calendar
Setting your Availability Calendar helps automate scheduling Sessions with students.
Click View Calendar in the Availability screen to set up your Availability Calendar, which looks like this:
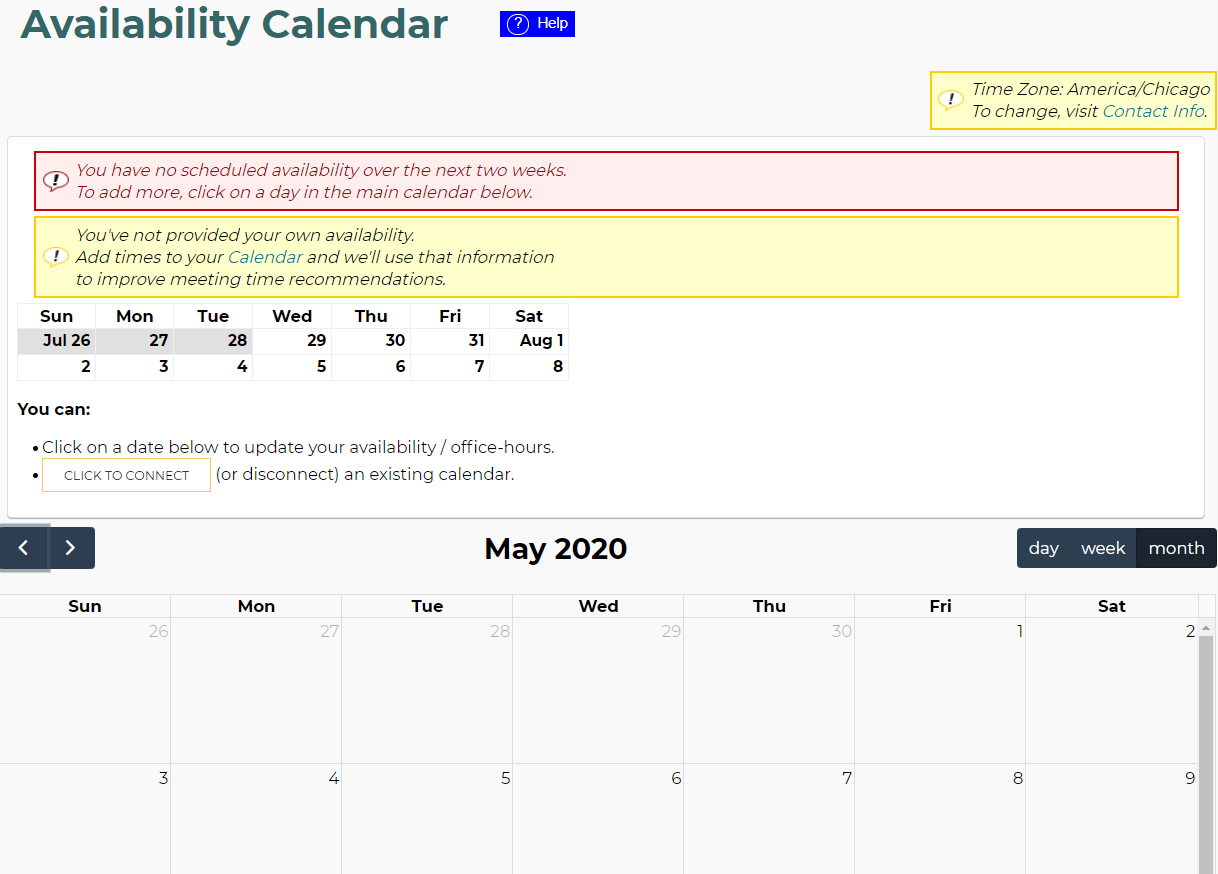
The Availability Calendar has two portions:
- You may connect your Innovation Portal account to an outside calendar service, such as Google Calendar, iCloud, or Outlook Calendar. Use the Click to Connect button to connect your calendar. This will automate the creation of meeting reminders on your outside calendar whenever a student schedules a mentorship session with you. This portion is optional, but in order to use it, you must also complete the second portion. Your outside calendar can be disconnected also, should you change your mind.
- You may mark in your Innovation Portal website’s calendar what times you are available for mentorship. When a student uses the Innovation Portal to schedule a mentorship session with you, the times you have marked as Available will be presented to the student in a list to select from. You may mark individual days and times, or create a repeating schedule.
To mark availability on the calendar, click inside the box of a date on the calendar to bring up the scheduling prompt:
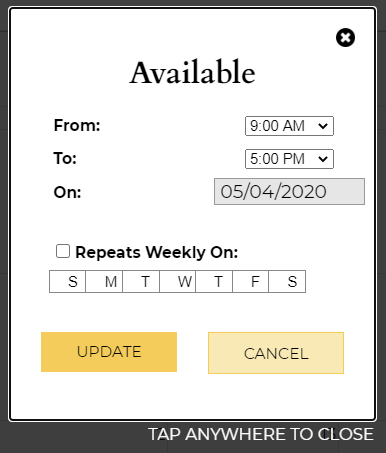
Choose a time frame and set whether you want the availability slot to repeat. If you choose repeat, you will be able to choose an end date for the repetition.
Sessions
Click Sessions in the main menu to access information on upcoming meetings with students, as well as review past meetings. The Sessions screen looks like this:
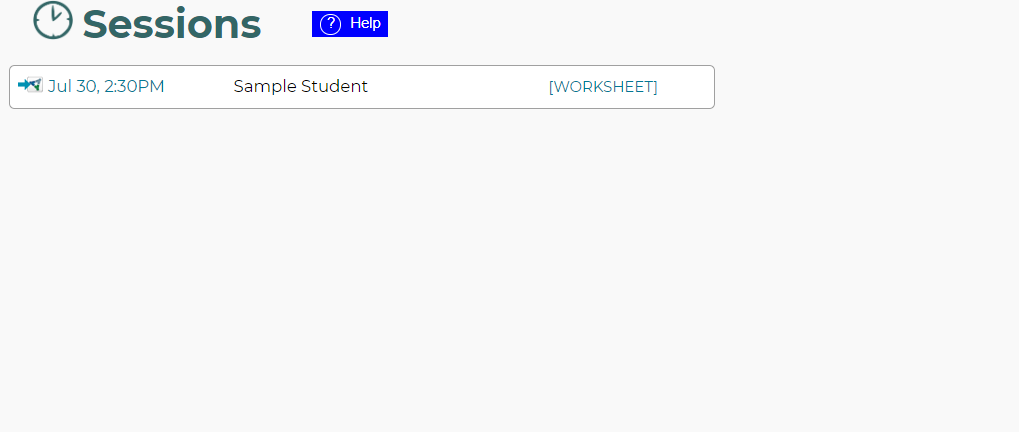
To reschedule or cancel a session, click on the date and time to see the reschedule prompt. To see information the student has provided about their project, click Worksheet.
The reschedule prompt looks like this:
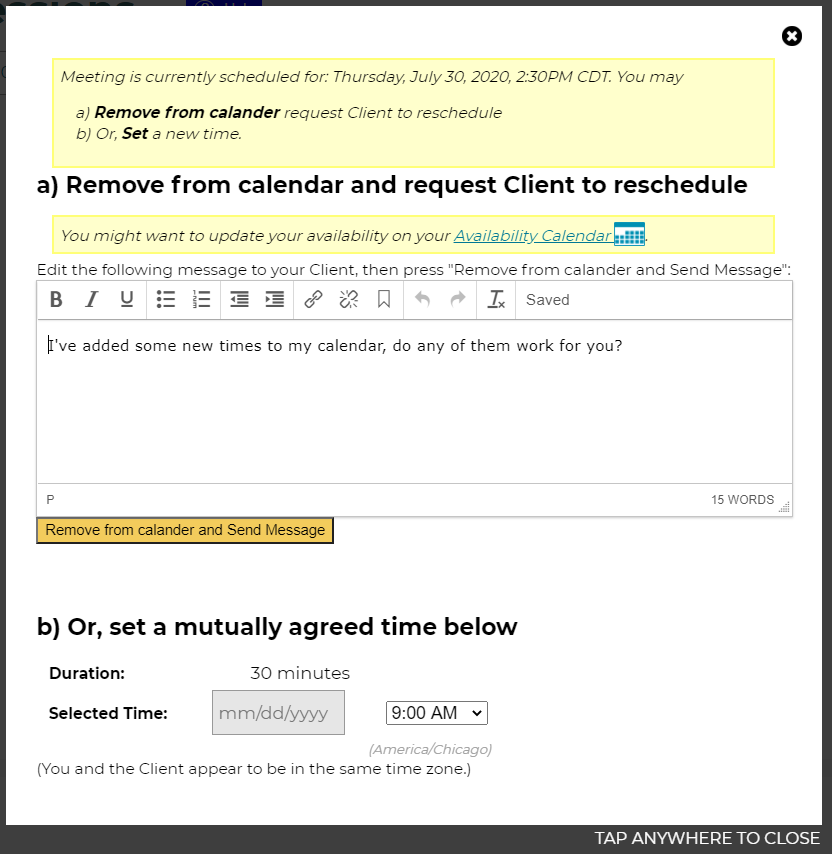
You may complete the A section or the B section, whichever is needed. Click outside the prompt box, or on the X in the corner, to close it.
Worksheet
The Session Worksheet shows details related to your meeting with a student. The Worksheet looks like this:
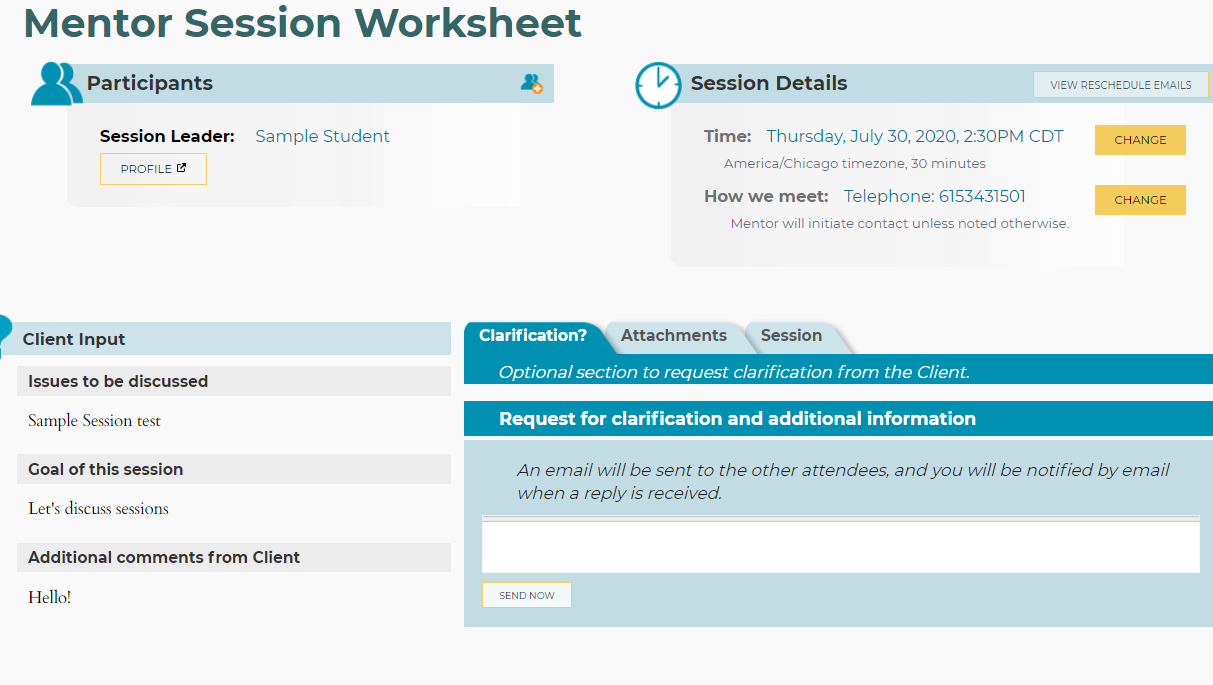
The Participants section allows you to check out the student’s profile. Like the previous screen, you can use the Session Details section to reschedule, or to change how you want to meet (such as by phone or Zoom). The Client Input is filled out by the student before the session and lists details about what the student wishes to discuss during the session. You can use the Clarification tab to ask questions about the session before and after the meeting. The Clarification tab will also list session system updates, such as if the details or attachments have changed. The student may also upload documents to the Attachments tab for the session for you to look at. Finally, the Session tab provides a digital notepad for you personally to use; the notepad is not shown to the student, so please feel free to use it how you wish.
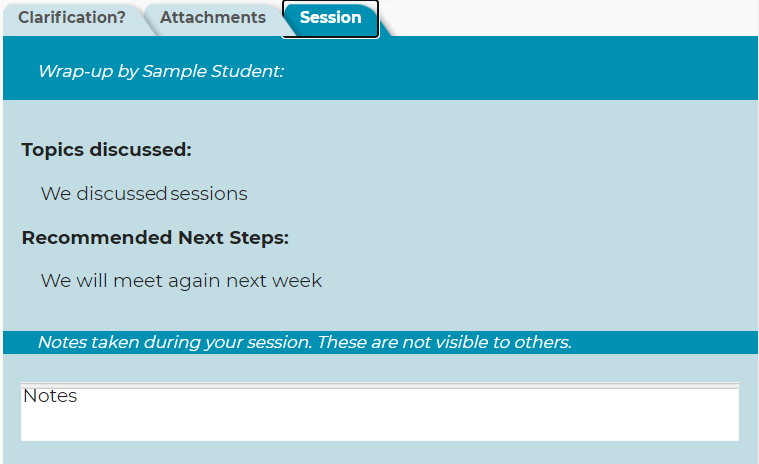
After your meeting, the student is responsible for filling out a session Wrap-up, which is visible on the Session tab of the Worksheet. A completed wrap-up report looks like this:
Once a session is completed, a checkmark will appear on the main Sessions list:

You can go back and review any previous Session by clicking on the Worksheet link.